Part2: Configuring Static Routes using a real World Scenario
Note: You can use Packet Tracer 5.3.3 to Practice this tutorial.
The Big Picture
Let’s assume that a
Multinational Company has recently opened its branch office in Kabul,
Afghanistan and has hired you as their Network Engineer, now they wants you to
connect them with their headquarter which is located in the New York, USA. The
branch and headquarter are connected
by a WAN T1 circuit. Not only that, but they have two more routers in their Kabul branch which have two small
Ethernet networks connected in to their LAN sides, so they wants you to connect them to those
networks as well, and they want you to do all these using Static and Default
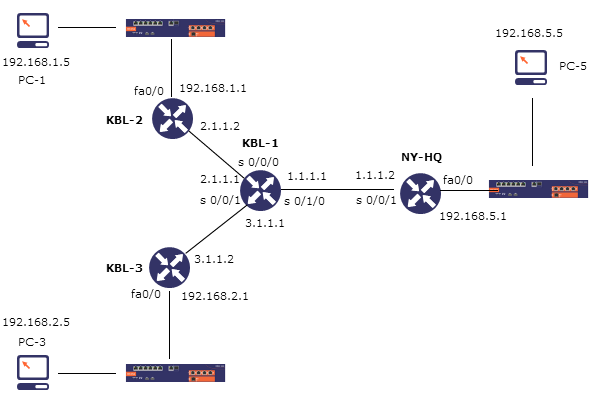
Route. Following is the big picture of our scenario.

In above Scenario, as you can see that KBL-2 and KBL-3 are
our two routers which have a small Ethernet networks connected with them and
uses 192.168.1.0/24 and 192.168.2.0/24 networks respectively. Furthermore both
KBL-2 and KBL-3 are connected with KBL-1 using 2.1.1.0/30 and 3.1.1.0/30
networks respectively and KBL-1 is connected with NY-HQ which is our New York Headquarter
using 1.1.1.0/30 network. Hopefully I have explained everything well and
now it time of configuration. We will start our configuration from KBL-1.
Configuring KBL-1
KBL-1 is a router which is located in Kabul and is connected
with KBL-2, KBL-3 and NY-HQ trough Serial port S 0/0/0, S 0/0/1 and S 0/1/0
using 2.1.1.0/30, 3.1.1.0/30 and 1.1.1.0/30 networks respectively.
First we will get into global configuration mode from privileged
mode where we will change the name of this router to KBL-1 by using the
hostname command.
Router>
Router>enable
Router#configure t
Router(config)#hostname KBL-1
Now from global configuration mode get into serial
interfaces, assign them IP and turn their status to UP.
KBL-1(config)#interface serial 0/0/0
KBL-1(config-if)#ip address 2.1.1.1 255.255.255.252
KBL-1(config-if)#no shutdown
KBL-1(config-if)#exit
KBL-1(config)#interface serial 0/1/0
KBL-1(config-if)#ip address 1.1.1.1 255.255.255.252
KBL-1(config-if)#no shutdown
KBL-1(config-if)#exit
KBL-1(config)#interface serial 0/0/1
KBL-1(config-if)#ip address 3.1.1.1 255.255.255.252
KBL-1(config-if)#no shutdown
KBL-1(config-if)#exit
Now that interfaces are up, we are ready to configure the static
route and by doing this our KBL-1 configuration is finish and our KBL-1 is ready.
KBL-1(config)#ip route 192.168.1.0 255.255.255.0 2.1.1.2
KBL-1(config)#ip route 192.168.2.0 255.255.255.0 3.1.1.2
KBL-1(config)#ip route 0.0.0.0 0.0.0.0 serial 0/1/0
KBL-1(config)#
Configuring KBL-2
Our KBL-2 router is connected with KBL-1 trough Serial interface S 0/0/0 using 2.1.1.0/30 network and has a small Ethernet network connected with it trough interface FastEthernet 0/0 using 192.168.1.0/24 network. here is the complete configuration for this router.Router>
Router#configure t
Router(config)#hostname KBL-2
KBL-2(config)#interface serial 0/0/0
KBL-2(config-if)#ip address 2.1.1.2 255.255.255.252
KBL-2(config-if)#no shutdown
KBL-2(config-if)#exit
KBL-2(config)#interface fastEthernet 0/0
KBL-2(config-if)#ip address 192.168.1.1 255.255.255.0
KBL-2(config-if)#no shutdown
KBL-2(config-if)#exit
KBL-2(config)#ip route 0.0.0.0 0.0.0.0 2.1.1.1
KBL-2(config)#
Configuring KBL-3
Our KBL-3 router is connected with KBL-1 trough Serial interface S 0/0/0 using 3.1.1.0/30 network and has a small Ethernet network connected with it trough interface FastEthernet 0/0 using 192.168.2.0/24 network. here is the complete configuration for this router.Router>
Router>enable
Router(config)#hostname KBL-3
KBL-3(config)#interface fastEthernet 0/0
KBL-3(config-if)#ip address 192.168.2.1 255.255.255.0
KBL-3(config-if)#no shutdown
KBL-3(config-if)#exit
KBL-3(config)#interface serial 0/0/0
KBL-3(config-if)#ip address 3.1.1.2 255.255.255.252
KBL-3(config-if)#no shutdown
KBL-3(config-if)#exit
KBL-3(config)#ip route 0.0.0.0 0.0.0.0 3.1.1.1
KBL-3(config)#
Configuring NY-HQ
The NY-HQ router is located in our Headquarter New York, USA which is connected to KBL-1 through Serial interface S0/0/1 and has a Ethernet network connected with it through FastEthernet 0/0 using 1.1.1.0/30 and 192.168.5.0/24 network respectively.Router>
Router>enable
Router#host
Router#configure t
Enter configuration commands, one per line. End with CNTL/Z.
Router(config)#hostname NY-HQ
NY-HQ(config)#interface serial 0/0/1
NY-HQ(config-if)#no shutdown
%LINK-5-CHANGED: Interface Serial0/0/1, changed state to up
NY-HQ(config)#interface fastEthernet 0/0
NY-HQ(config-if)#ip address 192.168.5.1 255.255.255.0
NY-HQ(config-if)#no shutdown
NY-HQ(config-if)#exit
NY-HQ(config)#
NY-HQ(config)#ip route 0.0.0.0 0.0.0.0 serial 0/0/1
NY-HQ(config)#

